

Buffalo Cauliflower – Best Crispy Baked Cauliflower Wings
Buffalo Cauliflower
Buffalo cauliflower is a flavorful vegetable dish made with tender cauliflower florets coated in a crisp seasoned coating, baked until golden, and finished with tangy buffalo sauce. It delivers the familiar spicy, buttery flavor associated with buffalo wings while using cauliflower as the main ingredient. The contrast between the crisp outer coating, tender center, and bold sauce makes it satisfying enough for a snack, appetizer, side dish, or light meal.
The secret to good buffalo cauliflower is not simply adding buffalo sauce to cooked cauliflower. The cauliflower needs to develop a crisp surface first, otherwise the sauce can make it soft and heavy. This recipe uses a seasoned batter that clings to each floret, followed by high-heat baking to create a firm coating. The buffalo sauce is added toward the end so the finished pieces retain as much crispness as possible.
Cauliflower is particularly well suited to this preparation because its mild flavor absorbs seasonings without competing with the sauce. When roasted at a high temperature, the edges become lightly browned while the inside remains tender. This gives the finished dish a texture that works especially well with spicy sauces.
For home cooks looking for Gluten Free Cauliflower Wings, the recipe can easily be adapted by using certified gluten-free flour and breadcrumbs. It can also become a completely plant-based appetizer by choosing vegan buffalo sauce and dairy-free ingredients. This flexibility makes buffalo cauliflower useful for family meals and gatherings where different dietary preferences need to be considered.
There are many Cauliflower Wing Recipes available, but the best versions pay close attention to moisture, coating thickness, and oven temperature. Cauliflower naturally contains a significant amount of water, so overcrowding the baking sheet can cause the florets to steam rather than roast. Leaving space between each piece allows hot air to circulate around the coating and encourages better browning.
The sauce is another important part of the recipe. Buffalo sauce should add heat and acidity without completely overwhelming the roasted cauliflower. A good coating is thin enough to flavor every piece but not so heavy that it destroys the crisp exterior. If you prefer a milder dish, use less buffalo sauce or combine it with a little melted butter or vegan butter.
This recipe can also serve as a base for several variations. Add more cayenne or hot sauce for Spicy Cauliflower Wings, use a gluten-free coating for Gf Cauliflower Wings, or replace the buffalo sauce with sweet chili sauce for Vegan Sweet Chili Cauliflower Wings. You can also prepare a milder version for children or guests who prefer less heat.
Whether you call them Cauliflower Hot Wings, Cauliflower Hot Wings Baked, or simply buffalo cauliflower, the cooking method remains straightforward. The cauliflower is coated, baked, turned for even browning, sauced, and finished in the oven. These steps create a dish that is crisp on the outside, tender inside, and packed with flavor.
If you are searching for Crispy Cauliflower Wings that do not require deep frying, this baked method is a practical option. It uses a hot oven and a properly spaced baking sheet to create a satisfying texture without filling the kitchen with frying oil. With a few simple techniques, you can make restaurant-style cauliflower wings at home.
Why You’ll Love This Recipe
Preparation and Cooking Time, Also Serving
Ingredients
For the Buffalo Sauce
For Garnishing
Substitution Notes
Step-by-Step Instructions

Step 1: Prepare the Cauliflower
Preheat the oven to 425°F (220°C) and line a large baking sheet with parchment paper or lightly grease it to prevent sticking. Remove the leaves and thick core from the cauliflower, then separate the head into medium-sized florets that are as similar in size as possible so they cook evenly. Rinse the florets if needed and dry them thoroughly with a clean kitchen towel because excess moisture can weaken the coating and prevent the cauliflower from becoming crisp.
Step 2: Prepare the Coating
Whisk the flour, milk, garlic powder, smoked paprika, onion powder, salt, and black pepper together in a large bowl until the mixture forms a smooth batter with a consistency slightly thinner than pancake batter. Place the panko breadcrumbs in a separate shallow bowl so the coated cauliflower can be transferred easily. The batter should cling to the cauliflower without forming a thick, heavy layer because an overly thick coating can remain soft in the center during baking.
Step 3: Coat the Cauliflower
Dip each cauliflower floret into the seasoned batter, turning it gently until the surface is covered, then allow excess batter to drip back into the bowl before rolling the floret through the panko breadcrumbs. Press the breadcrumbs lightly onto the surface so they adhere without compacting them too tightly. Arrange the coated florets on the prepared baking sheet with space between each piece because good airflow is essential for creating a crisp exterior rather than a steamed texture.
Step 4: Bake Until Crisp
Lightly drizzle or spray the coated cauliflower with olive oil, then place the baking sheet in the preheated oven and bake for approximately 20 minutes. Carefully turn each floret with tongs or a spatula once the underside has developed a golden color, then continue baking for another 10 to 15 minutes until the coating is crisp and browned around the edges and the cauliflower inside is tender when pierced with a fork.
Step 5: Prepare and Add the Buffalo Sauce
While the cauliflower is baking, combine the buffalo sauce, melted butter, optional honey, and garlic powder in a small bowl and stir until smooth. Once the cauliflower is crisp, transfer it to a large mixing bowl and pour the buffalo mixture over the florets in a thin stream while gently tossing so the sauce coats the pieces evenly without crushing the crispy coating. Use just enough sauce to cover the cauliflower because excessive sauce can quickly soften the exterior.
Step 6: Finish Baking and Serve
Return the sauced cauliflower to the baking sheet and bake for another 5 minutes to help the sauce set against the crisp coating without drying out the vegetable. Remove the tray from the oven and allow the cauliflower to rest for two minutes before transferring it to a serving dish, then garnish with fresh parsley, sliced green onions, or crushed red pepper flakes and serve immediately with your preferred dipping sauce.
How to Serve
Buffalo cauliflower is best served immediately after the final bake while the coating is still crisp and the buffalo sauce is warm. Transfer the pieces to a wide serving platter rather than piling them into a deep bowl, because stacking hot cauliflower traps steam and can soften the coating. A small bowl of dipping sauce placed alongside the cauliflower makes the dish easy to share and gives guests a way to balance the heat.

Additional Tips

Recipe Variations
Freezing and Storage
Refrigerating
Freezing
Reheating
Nutritional Information
Approximate values per serving
Nutritional values will vary depending on the buffalo sauce, milk, breadcrumbs, flour, and dipping sauce used.
Final Words
Buffalo cauliflower is a practical way to turn a simple head of cauliflower into a bold, satisfying appetizer. The combination of a crisp seasoned coating, tender roasted cauliflower, and tangy buffalo sauce provides plenty of texture and flavor without requiring deep frying. The recipe is also flexible enough to accommodate gluten-free, vegetarian, and vegan preferences.
The biggest difference between average cauliflower wings and truly Crispy Cauliflower Wings comes from moisture control and oven technique. Dry cauliflower thoroughly, avoid overcrowding the baking sheet, and bake at a high temperature before adding the sauce. Once the buffalo sauce is added, use only enough to coat the florets and finish them briefly in the oven.
If you are looking for Cauliflower Wing Recipes that work for parties, family dinners, or casual snacking, this method is worth keeping. It can easily become Gluten Free Cauliflower Wings, Gf Cauliflower Wings, Cauliflower Hot Wings Baked, or Spicy Vegan Cauliflower Wings simply by changing a few ingredients.
You can also move beyond buffalo sauce. A sweet chili glaze creates Vegan Sweet Chili Cauliflower Wings, while garlic Parmesan provides a milder alternative. Once you have the basic baking method down, there are many ways to turn cauliflower into a flavorful appetizer that feels completely different from plain roasted vegetables.
FAQs

Buffalo Cauliflower – Best Crispy Baked Cauliflower Wings
Course: Vegetable Recipes4
servings15
minutes35
minutes335
kcalIngredients
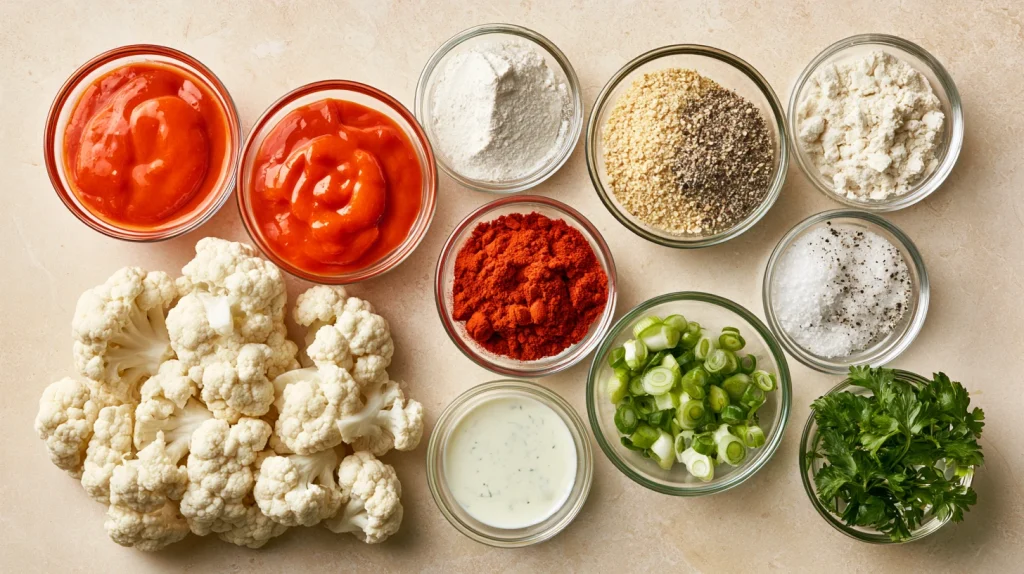
1 large head cauliflower, about 2 pounds (900 g)
1 cup all-purpose flour
1 cup milk
1 teaspoon garlic powder
1 teaspoon smoked paprika
½ teaspoon onion powder
½ teaspoon salt
¼ teaspoon black pepper
1 cup panko breadcrumbs
2 tablespoons olive oil
- For the Buffalo Sauce
¾ cup buffalo sauce
2 tablespoons melted butter
1 teaspoon honey, optional
¼ teaspoon garlic powder
- For Garnishing
2 tablespoons chopped fresh parsley
2 green onions, thinly sliced
Crushed red pepper flakes, optional
Directions
- Preheat the oven to 425°F (220°C) and line a large baking sheet with parchment paper or lightly grease it to prevent sticking. Remove the leaves and thick core from the cauliflower, then separate the head into medium-sized florets that are as similar in size as possible so they cook evenly. Rinse the florets if needed and dry them thoroughly with a clean kitchen towel because excess moisture can weaken the coating and prevent the cauliflower from becoming crisp.
- Whisk the flour, milk, garlic powder, smoked paprika, onion powder, salt, and black pepper together in a large bowl until the mixture forms a smooth batter with a consistency slightly thinner than pancake batter. Place the panko breadcrumbs in a separate shallow bowl so the coated cauliflower can be transferred easily. The batter should cling to the cauliflower without forming a thick, heavy layer because an overly thick coating can remain soft in the center during baking.
- Dip each cauliflower floret into the seasoned batter, turning it gently until the surface is covered, then allow excess batter to drip back into the bowl before rolling the floret through the panko breadcrumbs. Press the breadcrumbs lightly onto the surface so they adhere without compacting them too tightly. Arrange the coated florets on the prepared baking sheet with space between each piece because good airflow is essential for creating a crisp exterior rather than a steamed texture.
- Lightly drizzle or spray the coated cauliflower with olive oil, then place the baking sheet in the preheated oven and bake for approximately 20 minutes. Carefully turn each floret with tongs or a spatula once the underside has developed a golden color, then continue baking for another 10 to 15 minutes until the coating is crisp and browned around the edges and the cauliflower inside is tender when pierced with a fork.
- While the cauliflower is baking, combine the buffalo sauce, melted butter, optional honey, and garlic powder in a small bowl and stir until smooth. Once the cauliflower is crisp, transfer it to a large mixing bowl and pour the buffalo mixture over the florets in a thin stream while gently tossing so the sauce coats the pieces evenly without crushing the crispy coating. Use just enough sauce to cover the cauliflower because excessive sauce can quickly soften the exterior.
- Return the sauced cauliflower to the baking sheet and bake for another 5 minutes to help the sauce set against the crisp coating without drying out the vegetable. Remove the tray from the oven and allow the cauliflower to rest for two minutes before transferring it to a serving dish, then garnish with fresh parsley, sliced green onions, or crushed red pepper flakes and serve immediately with your preferred dipping sauce.